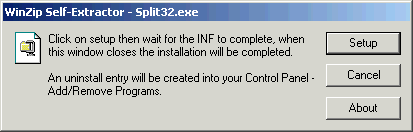
 A Winzip installation dialog appears explaining what will happen. From there either click on the button "Setup" to go on or "Cancel" to stop right here.
Thank you for downloading and using Split32. This is an ever ongoing work to provide you with the best file splitter for Windows all over the world. Enjoy!
This user guide only covers the GUI version of Split32. The console version CSplit32 has a built in help, simply start it in a DOS box without any parameters and off you go.
You can choose between two packages for Split32. The easiest and most recommended would be to download the EXE package. It unzips all the files into a temporary installation directory and launches the installation script for you. The installation script is a Microsoft INF file, this means that it only contains a repository of files and where they should go. Your Windows will read it and copy over all files where needed and also create registry entries to add an uninstall item in your Control Panel in the section "Add/Remove Programs".
The other option is to download the Zip file only, it contains exactly the same files so you can extract them yourself and then either launch the split.inf file yourself or copy over the programs wherever you want.
Download the split32.exe file from the web site and then run it.
A Winzip installation dialog appears explaining what will happen. From there either click on the button "Setup" to go on or "Cancel" to stop right here.
Once you clicked "Setup" the files are extracted and then copied over to the Program Files directory tree and in your Start Menu an entry is added for Split with two icons... one for the standalone GUI version and one that starts your web browser to launch the console version. The latter is the very first attempt to make a GUI for the split program as the first one was only a command line application. You should not use that one but it is there for you to experiment with. The "Split Standalone Program" is the one you should use and is the one actually documented here.
Download the Split32.Zip file and "browse" it with your XP Windows explorer or any other commercial un-zipper (I use WinZip).
Choose between the two files the ones you want (split32.exe and/or csplit32.exe) and extract them somewhere of your choice and make sure that the folder for csplit32.exe is in your search path (I install it in the Windows system folder as I consider it a system tool). You are on your own on how to do all of that... That comes with the "I wanna do it all myself with a Zip" way of working.
The console version is not documented in detail here. Open a DOS box and enter "csplit32", a usual "usage" text is displayed and the parameters are then explained.
The destination of the splitted parts is the same directory as the source file. Make sure you have enough available space on your disk!
The reason why the console version is not more documented than this is because people in need of such a version know their way with these things and they need not much more information than the "usage" text.
Please note that the console version is much more faster than the GUI version. If you need to split multigigabyte files you may want to try the console version to save you some time in the process of splitting.
 Click on your start menu, then "Program Files" or "All Programs", "Split" and finally "Split Standalone Program".
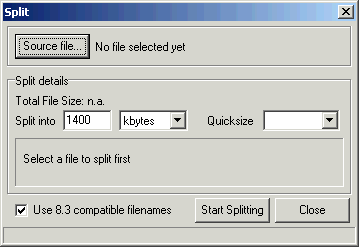
The main Split window appears with empty fields and nothing to do yet.
Note that it tells you all of that as much as possible already. The text area that normally shows the pathname of the file to split tells you that no file is selected yet and the area that shows the planned activty (estimation of timings and how many parts that will be made, etc... See further) also tells you to select a file to split first.
Before we want to identify the number of parts or their size it is wise to tell the program what file will be splitted in order to let it know how large the source file is. That way it can tell you what will be done with your file, how many parts will be made (if you specify the size), how large they will be (if you want a specific amount of parts) and how much time it would probably take to send them through various data channels.
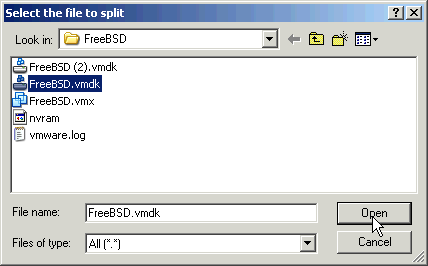 To do so click the top left button named "Source File...". A standard windows "Open File" dialog should appear. Browse your way accross your computer to find the file that you want to split and select it. This is a standard dialog box exactly like when you open a Notepad document (for example) so not much more explanation should come with it. Here is a screenshot of how it looks on my Windows XP.
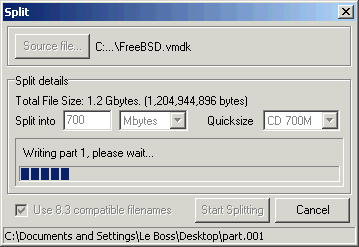
In this example a huge VMWare disk image of a FreeBSD virtual machine will be split to burn it onto CD for backup.
 Either fill in the number of parts or the size in the "Split into" field and choose from the drop down box what you specify (parts, size) or use the "Quicksize" drop down box to choose a standard size.
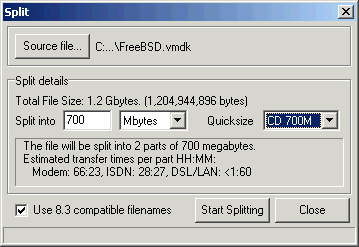
In the example a standard size of a 700 megabyte CD-ROM has been chosen.
The split details are updated with the selected part size and the transfer times. In my example this means that two parts will be required. Note though that even if it says that two parts of 700MB will be made that the last part will be shorter. This is rather logical as the total file size is not exactly twice 700MB but a lot shorter: 1200MB or 1.2GB. We may expect the last part to be around 500MB. This is perfectly fine as this will leave plenty of space to store the unsplit batch scripts that will glue the parts together again onto the second CD as well.
There is a dedicated chapter about the checkbox named "Use 8.3 compatible file names" later. For now just leave it checked, this is the safest way to work.
Click on "Start Splitting" to start the splitting.
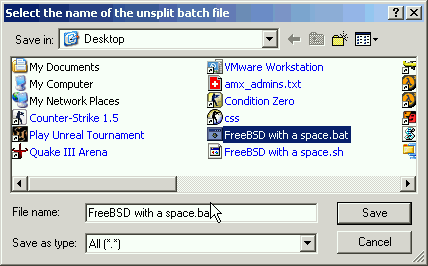 It does not start instantaneously... It asks you where to save the "Unsplit batch file" first. This not only lets you choose where to save the parts but also how they will be named! Browse around your computer where you want the parts stored and optionally change the name of the parts and batch files.
In the example I will save my pieces of disk image onto the Desktop to drag and drop them later onto my CD burning software.
Note that if you checked "Use 8.3 compatible file names" on the main window that the part names could be renamed as "part" if the name you select does not comply to the 8.3 file name rules, the batch files however will carry the selected name. But more about that in the dedicated chapter for 8.3 file names.
 As soon as you confirm your "Save As" standard window (yes standard again) then the splitting starts.
The split details area changes into a progress area showing which part is being written and how far we are with the whole job. The actual file name of the part currently being written shows up in the status bar (bottom line of the window) and a progress bar shows the total progress of the source file being splitted.
You can cancel the operation at any time by clicking the cancel button or pressing the "Esc" key on your keyboard. The parts written so far will be erased (what could you do without all the parts to reassemble your source file anyway?).
 When the splitting is finished one or two popup boxes tell you what has been done. If you had two popups then this means that the 8.3 file name compatibility kicked in and the popup told you what changed and why.
You can now transfer your parts, send them by mail, burn them on CD, copy them over with floppy disks, whatever you wanted to do with them.
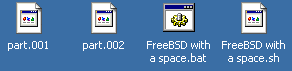
Do not forget to include one or both of the unsplit batch files. You really only need one if you know what operating system runs on the computer where the parts are to be reassembled. For Windows based systems use the *.BAT file, for Linux based systems use the *.SH file. In case of doubt use both and let the person at the other end decide.
To restore the original file you need to put all the parts onto the same folder (alias directory) together with the unsplit batch script.
If you are missing one part or if a part is corrupted or incomplete then the restore will fail.
Once all parts are in the same folder together with the BAT file then simply double click the BAT file and Windows should open a DOS box and run the batch. Alternatively you may open a DOS box yourself, switch to the folder where the parts are and enter the name of the batch file (surround it by quotes if it contains spaces).
The batch will concatenate the parts one after another and delete those done as it goes. This allows to restore the parts on a disk that has not enough space to contain twice the large file and also does the cleanup of the no longer needed parts after restoration.
When done check if the restored file is correct. In case of failure check for one or more the following potential reasons:
First of all this should be done from within the directory where all the parts and the script where copied. Chdir to the correct directory from within a shell console.
The linux shell script should be made executable first: chmod 755 unsplit.sh or chmod a+x unsplit.sh. (replace "unsplit" by the real name of the script as chosen during the split operation).
Next launch the script, do not forget the dot-slash if that directory is not in the search path: ./unsplit.sh.
The script will do its thing the same way as for the DOS batch, it will concatenate the parts one after another and delete those done as it goes. This allows to restore the parts on a disk that has not enough space to contain twice the large file and also does the cleanup of the no longer needed parts after restoration.
When done check if the restored file is correct. In case of failure check for one or more the following potential reasons:
When transfering files across the net via e-mail very often the spaces in filenames are scrambled into other characters by the time they get at their destination. Moreover if you want to restore the parts onto an old system that cannot understand LFN (long file names) like pre-Windows 95 Microsoft operating systems then the file names should be in the 8.3 format. The same could be true for some old archiving programs (old PK-Zip or other archivers) if you want to compress the parts after splitting (PS: it is better to compress the source file first to save you some work and to make sure that all parts are equal in size in the end).
To avoid any troubles of filename changes or impossible filenames in some circumstances I added an automatic verification of destination filename parts in case you want Split to do so. This verification is made when the option "Use 8.3 compatible filenames" is checked.
This is what it does:
... Then the parts are renamed into "part".
The extension of the parts file name is always a three digit number indicating its sequence to reconstruct the source file.
The batch script files remain unchanged no matter what you choose (except their extension).
If the parts are to be sent by e-mail or need to be restored on a very old system then leave it checked.
If the parts of different source files need to be copied onto the same directory then leave it unchecked because else the last splitted parts will overwrite the first ones causing them to be deleted. If you want to make clear on a CD backup that that disk belongs to a certain source file then leaving it unchecked is also better as you will be able to see by the part filename on each CD to which backup it belongs.
In case of doubt always keep it checked. In fact you can keep it checked by default and only uncheck it if you really want to use the full filenames for your parts.
Why creating unsplit scripts instead of a user friendly executable program?
The scripts are much smaller in size and very often executable programs are blocked by corporate mail servers.
Why creating a Linux unsplit script and not a Linux version of the splitter to start with?
Linux already has a split utility (try a Google search on "linux man split"). Agreed it is a console based version only but it is more powerfull as it also allows to split text files into files of a fixed amount of lines (to name one example).
I found a bug or I want to see this or that feature added to Split32, where do I report my findings?
Send me a mail message, check the address on my web site (it is at the bottom of each page)
Split really sucks in my opinion, that other competing product is way better!
Then stop flaming and use the other product or be more constructive and send improvement suggestions... your name will be on my web site as a contributor (like those there already).
This product is really cool I want to support you by sending money!
Split is freeware but donations are always accepted, check the web site's main page for the PayPal donation link. To add more comments to your donation simply send a mail too.
I have been sendig you several mail messages but never got any answer, do you read your mail?
Yes every day, but I am also drowning under excessive spam attacks. I activated my ISP's spam filter and your mail message may have been filtered out. Try sending from another account, avoid image attachments or zip them, digitally sign your message.
You keep referring to your web site but I got your program from a friend, where is your web site?
http://www.tonton.be/